This article provides a detailed maintenance procedure for inspecting, cleaning, and replacing the NXB-MNT-813-008 Tool Adapter Plate on compatible NexBot robot arms.
Related Products
Tools Required
- Calibrated torque wrench
- M6 hex key set
- Lint-free cloths
- Isopropyl alcohol
- Medium-strength thread-locking compound
- Personal Protective Equipment (PPE)
Article
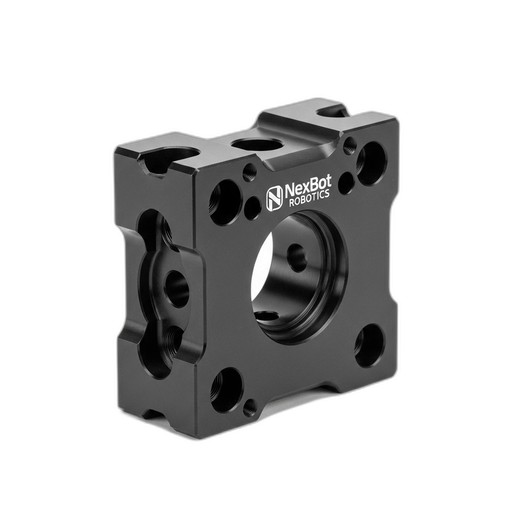
The NexBot Safety 813-008 Tool Adapter Plate (SKU: NXB-MNT-813-008) provides the critical mechanical interface between the robot's J6 wrist flange and its End-of-Arm Tooling (EOAT). Proper maintenance of this component is essential for ensuring positional accuracy, repeatability, and operational safety. This guide outlines the scheduled maintenance procedure for this adapter plate.
Maintenance Schedule
The inspection frequency for the NXB-MNT-813-008 depends on the application's duty cycle, payload, and operating environment. Adhere to the following baseline recommendations:
- Standard Duty / Low-Cycle Applications: Perform a full inspection annually or every 2,000 hours of operation, whichever comes first.
- Heavy Duty / High-Cycle Applications: Perform a full inspection quarterly or every 500 hours of operation. This includes applications with high payloads, significant vibration, or frequent tool changes.
- After a Collision Event: Inspect the adapter plate immediately following any robot collision or unexpected stoppage involving the EOAT.
Safety Precautions
Failure to follow safety procedures can result in serious injury or equipment damage. Always perform the following before beginning any maintenance work:
- Move the robot arm to a designated maintenance position where the J6 flange is easily accessible.
- Power down the robot controller and the main electrical disconnect.
- Follow all site-specific Lockout/Tagout (LOTO) procedures to ensure the system cannot be energized accidentally.
- Wear appropriate Personal Protective Equipment (PPE), including safety glasses and protective gloves.
- If the EOAT is heavy, use a certified lifting device or support stand to secure it before and during removal.
Required Parts and Tools
Parts
- Replacement Plate: 1x NXB-MNT-813-008 Tool Adapter Plate (if replacement is necessary)
- Fasteners: A new set of M6 bolts (Grade 12.9 recommended) for mounting the plate to the J6 flange. Always use new fasteners upon reinstallation.
Tools
- Torque Wrench (calibrated, with a range suitable for 10-15 Nm)
- M6 Hex Socket or Key
- Lint-free cloths
- Isopropyl alcohol or other approved non-residue cleaning solvent
- Medium-strength (blue) thread-locking compound
- Mechanical lift or support stand for heavy EOAT
Maintenance Procedure
Step 1: Disconnect and Remove EOAT
- Ensure all safety precautions have been implemented.
- Disconnect any pneumatic, electrical, or data cables running to the EOAT.
- Secure the EOAT with a lifting device or support stand.
- Carefully unfasten the bolts securing the EOAT to the NXB-MNT-813-008 adapter plate.
- Remove the EOAT and move it to a safe staging area.
Step 2: Remove and Inspect the Adapter Plate
- Unfasten the four M6 bolts securing the NXB-MNT-813-008 plate to the robot's J6 flange. Discard the old bolts.
- Carefully remove the adapter plate. Note the orientation of the alignment dowel pin.
- Thoroughly clean the plate and the robot's J6 mounting face with isopropyl alcohol and a lint-free cloth. Remove all old thread-locking compound, grease, and debris.
- Perform a detailed inspection of the adapter plate (NXB-MNT-813-008):
- Surface Flatness: Check for any signs of warping or bending.
- Cracks: Look for stress fractures, especially around the mounting holes.
- Mounting Holes: Inspect the threads for stripping, cross-threading, or excessive wear.
- Dowel Pin Hole: Check the dowel pin hole for signs of elongation or deformation, which can indicate slippage.
- If any damage, warping, or significant wear is found, the plate must be replaced with a new NXB-MNT-813-008.
Step 3: Reinstallation
- Align the new or inspected adapter plate with the robot's J6 flange, ensuring the dowel pin is correctly seated.
- Apply a small drop of medium-strength thread-locking compound to the threads of the new M6 bolts.
- Insert all four M6 bolts and tighten them by hand in a star or cross pattern to ensure the plate seats evenly.
- Using a calibrated torque wrench, tighten the bolts in the same star pattern to the value specified in the service manual for your specific robot model (e.g., NexBot R-20 series). If a manual is not available, a general specification for a Grade 12.9 M6 bolt into steel is 12 Nm. Always verify the correct torque value from official robot documentation.
- Re-mount the EOAT to the adapter plate, following the same bolt preparation and torqueing sequence.
- Reconnect all pneumatic and electrical lines to the EOAT.
Verification
- Remove all tools from the work area.
- Carefully remove the LOTO devices and power on the robot controller.
- In teach mode and at a low speed (10% or less), jog the J6 axis to confirm smooth, unrestricted movement.
- Execute a Tool Center Point (TCP) verification routine. A significant deviation from the previously calibrated TCP may indicate improper mounting and requires the reinstallation procedure to be repeated.
- Test the function of the EOAT (e.g., gripper open/close, tool activation).
- Run the robot through its intended path in a test cycle without product to confirm proper operation before returning it to production.